Walton Live Chat Support: Click Here

Sunday, May 29, 2016

Walton Primo N2 এর জন্য TWRP,Root,স্টক রম নিয়া সম্পূর্ণ আলোচনা (পর্ব –১)

Tags


বিসমিল্লাহি রহমানির রহিম

আজকে TWRP,Root,স্টক রম নিয়া আলোচনা করবো শুধুমাত্র Walton Primo N2 মোবাইল নিয়া
:twisted: [ বিঃদ্রঃ আমার কোন লিখা কপি করার চেষ্টা করবেননা আশা করি ] :twisted:
ডাউনলোডের আগে নতুন পুরনো সকলের জন্য রুট প্রক্রিয়াটা আরও একবার বর্ণনা করছি
Tools Link:
প্রথমে আপনাকে টুলস গুলো ডাউনলোড করতে হবে

TWRP Installation:

ভিডিও টি দেখলেই হবে :)

দেখতে ক্লিক করুন


কিভাবে রম ব্যাকআপ রাখবেন ? নিচে নিয়ম দেয়া আছে  :)
এবার সেটটা বন্ধ করুন।
১) সেট বন্ধ অবস্থাই Volume UP + Power Button + Home একসাথে প্রেস করে Recovery Mod এ যান।
২) Recovery Mod এ গেলে দেখবেন Backup আছে তাতে ঢুকেন।
৩) Backup এর ভিতর দেখবেন Backup অপশন আছে সব কিছু Select করে ব্যাকআপ করবেন।
৪) ক্লিক করেন আর ওয়েট করুন। একটু টাইম লাগবে ব্যাকআপ হতে।
৫) ফুল ব্যাকআপ হয়ে গেলে সেট রিবুট দেন অ্যান্ড মেমরি কার্ড এ দেখেন TWRP নামে ফোল্ডার হইছে। ৬) এর ভিতর Backup ফোল্ডার আছে এবং তার ভেতর Date & Time দেয়া একটা ফোল্ডার।
৭) এইটাই আপনার Stock Rom ব্যাকআপ।
এইটা সংগ্রহ করুন।
কিভাবে রুট করবেন !
এই লিঙ্ক থেকে Super Su টি ডাউনলোড করুন
ডাউনলোড শেষ হলে সেট বন্ধ অবস্থাই Volume UP + Power Button + Home একসাথে প্রেস করে Recovery Mod এ যান
তারপর জিপ ফাইলটি TWRP দিয়ে ইন্সটল করুন, ইন্সটল শেষ হলে অটো রিস্টার্ট নেবে। তারপর মোবাইল ওপেন হলে দেখবেন নতুন Super Su অ্যাপ এসেছে, অ্যাপ এ প্রবেশ করে অ্যাপটি ইন্টারনেট দিয়ে আপডেট করবেন তাহলেই কাজ শেষ। আপনার সেট রুটেড।
{বিঃদ্রঃ সকল কাজ নিজের দায়িত্তে করবেন }
ইচ্ছে হলে আমাকে ফেসবুক এ পেতে যোগাযোগ করুন এইখানে
এন্ড্রয়েড আলোচনা পেজ, এইখানে ক্লিক করুন
(ধন্যবাদ সবাইকে,ভাল থাকবেন এবং নতুন নতুন রম  সহ আরও অন্যান্য টিউন করব ইনশা-আল্লাহ, তাই  সাথেই থাকুন  )
চলে যাচ্ছি, দেখা হবে আগামি টিউন এ
7VLXuuR.gif

Monday, May 23, 2016

Primo H4 রম ওয়ালটন প্রিমো GH5 এর জন্য ! (MT6580) (পর্ব –৩)

Tags


বিসমিল্লাহি রহমানির রহিম
(বিঃদ্রঃ আমার কোন লিখা বা অন্য কিছুই কপি করার চেষ্টা করবেননা আশা করি)
CWM,Root,ব্যাকআপ নিয়া আলোচনা করেছিলাম। প্রয়োজনে এই খানে ক্লিক করুন।
আজকে আপনাদের আরও একটি সুন্দর কাস্টম রম দেখাবো।
প্রথমেই আপনাকে বলছি যে, CWM,Root আপনার ওয়ালটন প্রিমো GH5 মোবাইল এ থাকতে হবে। এবং আর পদ্দতি পর্ব ১ এ দেয়া হইছে।
এখন তাহলে শুরু করা যাক আজকের ওয়ালটন প্রিমো GH5এর আরও একটি কাস্টম রম নিয়া।
আজকের কাস্টম রমটির নাম Primo H4
এই রমটিতে যা যা  ফিচার আছে তা হল ঃ

ফিচার জানিয়ে দরকার নেই বলে আমি মনে করি, কারন এটা সম্পূর্ণ Primo H4  :)
Screenshot
যা যা লাগবে ইন্সটল করতে :)
Root Link : Click Here
Recovery Tools Link : Click Here
Recovery Img : CWM
Custom  Rom Link : click here
 যেভাবে ইন্সটল করবেন CWM recovery পদ্ধতি  :)
CWM recovery তে যাবেন, গিয়ে সেখানে Storage & Mount লিখা থাকবে
প্রবেশ করে System,Data,Catch এই ৩টি ফরমেট(Format) করবেন।
এখন ইন্সটল জিপ ফাইল এ যাবেন, সেখান থেকে আপনার মেমোরি হতে
রমটির জিপ ফাইল টি দেখিয়ে দিবেন আর ইন্সটল শুরু হবে।
ইন্সটল ৫মিনিট এর মদ্ধে শেষ হবে।
শেষ হবার পর Walton Primo GH5 টি Restart দিন।
colour-spinning-wheel.gif
biggrin.png  এখন আপনার রমটি ইন্সটল করা শেষ এবং উপভুগ করুন সুন্দর  Primo H4 রমটি biggrin.png
{বিঃদ্রঃ সকল কাজ নিজের দায়িত্তে করবেন }
(বিঃদ্রঃ আমার কোন লিখা বা অন্য কিছুই কপি করার চেষ্টা করবেননা আশা করি)
এই রমটি সর্বপ্রথম এই টেকটিউনস  ওয়েবসাইট এই টিউন করা হয়েছে।
এই টিউন সংক্রান্ত কোন বিষয় থাকলে নিচে টিউমেন্ট করুন
ইচ্ছে হলে আমাকে ফেসবুক এ পেতে যোগাযোগ করুন এইখানে
এবং এন্ড্রয়েড আলোচনা পেজ, এইখানে ক্লিক করুন
(ধন্যবাদ সবাইকে,ভাল থাকবেন এবং নতুন নতুন রম  সহ আরও অন্যান্য টিউন করব ইনশা-আল্লাহ, তাই টেকটিউনস এর সাথেই থাকুন  )
চলে যাচ্ছি, দেখা হবে আগামি টিউন এ
7VLXuuR.gif

Sunday, May 22, 2016

How to Fix Lost IMEI and Serial Numbers

Tags


How to Fix Lost IMEI and Serial Numbers


If these methods fail, check to see if you have a valid Serial Number.
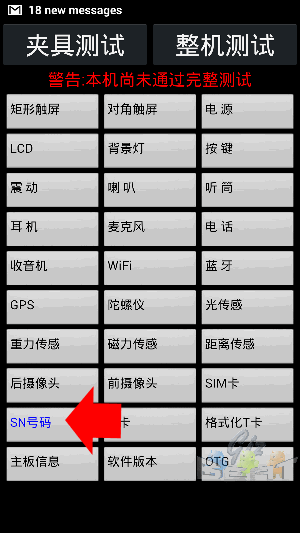
1. From your phone keypad, type in *#06#.
sn-20
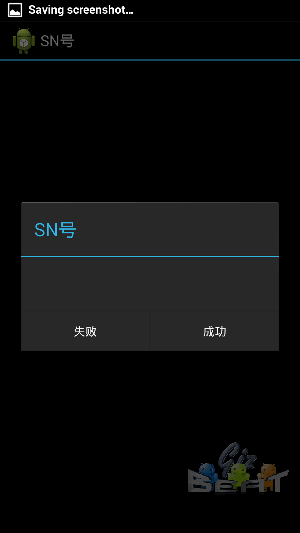
2. Tap on SN. If it shows a blank space, that means you would first have to restore your Serial Number before you can work on fixing the IMEI.
sn-16
NOTE: This method assumes your Serial Number is also invalid or null. However, if you have a valid Serial Number and only need to restore IMEI, you can still use this guide. Just choose method B below and do the IMEI Download option.
Requirements:
  • Maui META Tool
  • MTK Drivers And One More Driver
  • PC
  • MTK Phone and Data Cable
  • NVRAM Database file for current ROM (You Find in Your Phone Firmware File)EX: BPLGUInfoCustomAppSrcP_MT6580_S00_MOLY_WR8_W1449_MD_WG_MP_V6_P12_1_wg_n
  • Baseband configuration (.ini) file from manufacturer OR Serial Number and IMEI Numbers shown on the sticker on your phone’s battery tray
Connect to Maui META
1. Extract and install Maui META Software. Do not launch the program yet.
2. Switch your phone on and connect it to your PC. Install MediaTek VCOM Drivers.
3. Disconnect your phone and turn it off.
4. Keeping Device Manager open and visible in the background, locate MauiMETA Program and Run as Administrator.
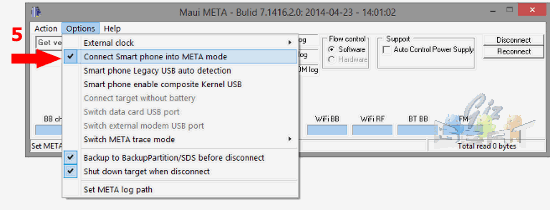
5. Click on Options in the menu bar, and select “Connect Smart phone into META mode”
sn-1
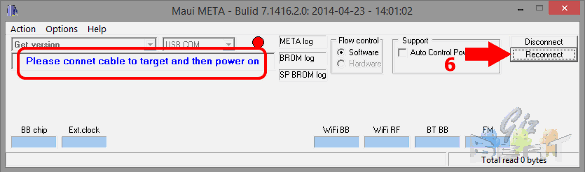
6. Click on Reconnect. Maui META will now ask you to “Please connect cable to target and then power on”.
sn-2
7. Connect your phone to the PC, but DO NOT turn it on. Maui META will trigger the power up sequence. You should hear about 2 connect-disconnect sequence sounds from your PC.
a. During the first connection to Maui META, your phone will boot partially while CDC VCOM Drivers are installed automatically. Wait for it to finish.
b. After successful installation, you should see “Gadget CDC VCOM Driver (COMxx)” in Device Manager.
c. Even if the installation was successful, Maui META may still be unable to connect to your phone. If this is the case, close Maui META and disconnect your phone. Shut your phone off manually.
d. Run Maui META as administrator again and repeat step 5 to 7 and proceed to step 8.
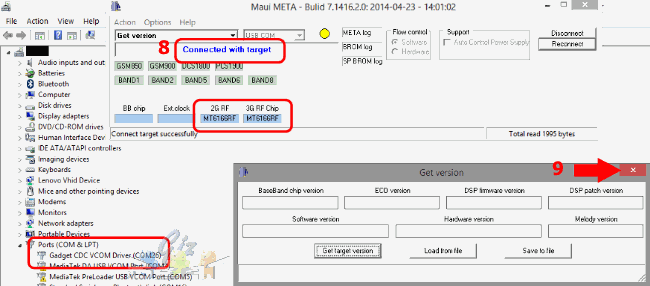
8. Check if the connection was successful.
It is successful if you see the following:
  • Your phone will appear in Device Manager as a Gadget CDC VCOM Driver (COMxx)
  • Maui META indicates “Connected with Target” and shows your RF chip versions
  • Your phone shows a static boot logo
sn-13
If the connection was successful, proceed to step 9. However, f your phone shows as a MediaTek Preloader in Device Manager, or if your phone starts charging via USB, follow the steps below.
a. Go to Device Manager, highlight your phone in the list and right-click on it. Choose to update drivers manually, then point to this folder:  (D:\…\MTK_USB_ADB_Ultimate\All MTK USB Driver 2014 Properties)
b. Disconnect your phone, and repeat steps 5 to 8.
c. If you are continuously returning to these sub-steps, try using a different USB port.
(note: If your phone is not showing in Device Manager at all, uninstall drivers. Download USBdeview software, Run as Administrator, then uninstall your phone’s Device IDs. Restart at step 2.)
9. Once your phone boots into META mode, a Get Version pop up window will appear. Ignore and close this window.
Restoring Values
From here, there are two possible methods to go through. If the Update Parameter does not work (i.e. no successful flash message), do method B.
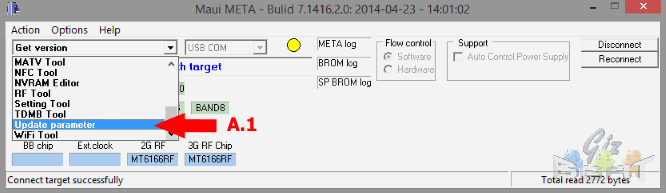
A. Update Parameter
A.1. In the main Maui META window, click on the drop down menu and select Update Parameter.
sn-4
A.2. At the bottom of the pop up window, tick Barcode.
A.3. Click on “Change NVRAM Database” and select the NVRAM Database file that is suitable for your current ROM. Click Open.
sn-5
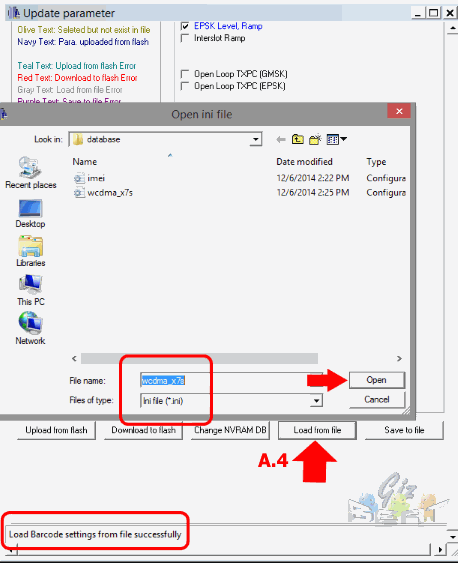
A.4. Click on “Load from File” and select the .ini file that is compatible with your phone.
sn-7
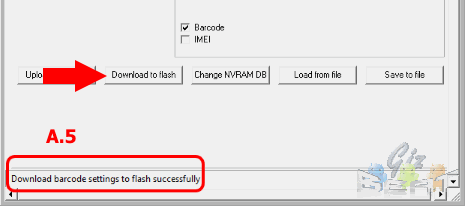
A.5. Click on Download to Flash and wait for this message: “Download Barcode Settings to flash successfully”.
sn-14
B. Barcode Download + IMEI Download
B.1. Barcode Download
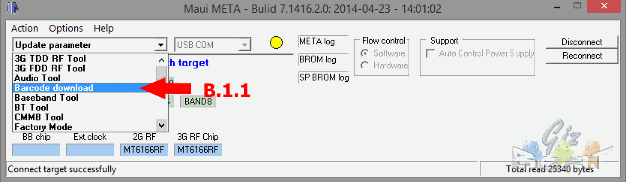
B.1.1. In the main Maui META window, click on the drop down menu and select Barcode Download.
sn-8
B.1.2. Click on “Change NVRAM Database” and select the NVRAM Database file that is suitable for your current ROM. Click Open.
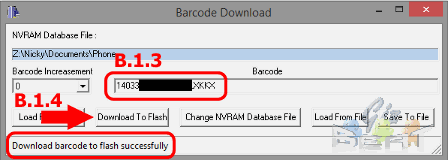
B.1.3. Type in the Serial Number you obtained from the back of the phone.
(If you are restoring a backup, click on “Load from File” and select the appropriate .ini file.)
sn-10
B.1.4. Click on “Download to Flash”. Check the bottom of the window to see if the flash was successful.
B.1.5. Close the Barcode Download window.
B.2 IMEI Download
B.2.1. In the main Maui META window, click on the drop down menu and select IMEI Download.
B.2.2 Click on “Change NVRAM Database” and select the NVRAM Database file that is compatible with your current ROM version. Click Open.
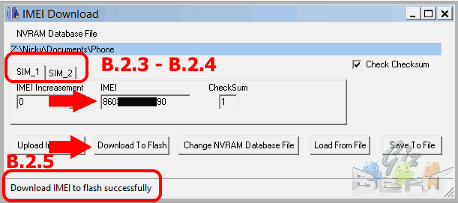
B.2.3. In the SIM1 tab, type in the IMEI for SIM1. (Note: the last number of the IMEI goes into the checksum box.)
B.2.4. Click on SIM2 tab, and enter the IMEI for SIM2.
(If you are restoring a backup, select “Load From File” and select the appropriate .ini file. You only need to load this once for both IMEI numbers.)
sn-11
B.2.5. Click on “Download to Flash”. Check the bottom of the window to see if the flash was successful.
Exiting META Mode
1. Close all pop-up windows.
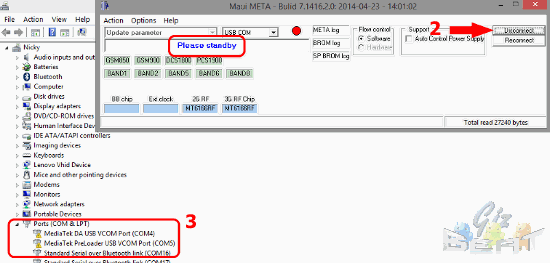
2. Click on Disconnect, you should see a message saying “Please Standby”
3. Wait for Gadget CDC VCOM Driver to disappear from Device Manager List.
sn-12
4. Wait for your phone to shutdown and enter charging mode.
5. Close Maui META and disconnect your phone.
You may now reboot your phone and check via *#66# and *#06# if you now have a valid Serial Number and IMEI Numbers.

{বিঃদ্রঃ সকল কাজ নিজের দায়িত্তে করবেন }
(বিঃদ্রঃ আমার কোন লিখা বা অন্য কিছুই কপি করার চেষ্টা করবেননা আশা করি)
এই টিউন সংক্রান্ত কোন বিষয় থাকলে নিচে টিউমেন্ট করুন
ইচ্ছে হলে আমাকে ফেসবুক এ পেতে যোগাযোগ করুন এইখানে
এবং এন্ড্রয়েড আলোচনা পেজ, এইখানে ক্লিক করুন

Thursday, May 19, 2016

[GUIDE] How To Port Any Custom Recovery To MTK

Tags


Due to lack of development on many MTK devices there aren't any recoveries and people have a hard time flashing ROMs on their MTK Device. Today I am here with a guide to show you how to port a custom recovery to your MTK device. And I have been asked multiple times on how to port a recovery, so I finally decided to make a guide.

This guide will work on MT6572, MT6582, MT6577, MT6589, MT6592. MT6571 and it will also work on other variants of the above chipsets such as MT6582M, MT6589T, MT6592M and so on

Do not replicate, duplicate and copy any of the content of this site

Things you need :
CarlivImage Kitchen : This is needed to unpack and repack the recovery (it will unpack any type of recovery)
- Stock boot.img and recovery.img
- A little time and patience
Carliv Touch Recovery (Download the recovery for your resolution)
Note : You can use port any recovery but make sure the resolution and chipset matches

How To :
- Rename stock recovery.img to stock_recovery.img and port recovery.img as port-recovery.img
- Just drag the recoveries in the .bat file in CarlivImage Kitchen and it will unpack them. 
- Replace from stock to port :
* meta_init.project.rc
* meta_init.rc
meta_init.modem.rc
* ueventd.rc
* ueventd.goldfish.rc
* fstab
* /etc/recovery.fstab
* replace kernel
* kernel_header (depends on the tool you used)

Note : Repack and test the recovery, whether it boots or not. After done unpack the new recovery and make the following changes 

- Compare default.prop of stock and port and only change the following lines (colored in red)

#
# ADDITIONAL_DEFAULT_PROPERTIES
#
ro.secure=0
ro.allow.mock.location=1
persist.mtk.aee.aed=on
ro.debuggable=1
persist.service.acm.enable=0
persist.sys.usb.config=mass_storage,adb
ro.bootloader.mode=download
ro.mount.fs=EXT4
# begin build properties
# autogenerated by buildinfo.sh
ro.build.id=KTU84Q
ro.build.display.id=cm_new-eng 4.4.4 KTU84Q 347d7427a4 test-keys
ro.build.version.incremental=347d7427a4
ro.build.version.sdk=19
ro.build.version.codename=REL
ro.build.version.release=4.4.4
ro.build.date=Tue Dec  9 16:23:16 EET 2014
ro.build.date.utc=0
ro.build.type=eng
ro.build.user=carliv
ro.build.host=max
ro.build.tags=test-keys
ro.product.brand=mtk
ro.product.name=cm_new
ro.product.board=
ro.product.cpu.abi=armeabi-v7a
ro.product.cpu.abi2=armeabi
ro.product.manufacturer=mtk
ro.product.locale.language=en
ro.product.locale.region=US
ro.wifi.channels=
ro.board.platform=mt6582
# ro.build.product is obsolete; use ro.product.device
ro.build.product=new
ro.product.model=new
ro.product.device=new
# Do not try to parse ro.build.description or .fingerprint
ro.build.description=cm_new-eng 4.4.4 KTU84Q 347d7427a4 test-keys
ro.build.fingerprint=mtk/cm_new/new:4.4.4/KTU84Q/347d7427a4:eng/test-keys
ro.build.characteristics=default
ro.cm.device=new
# end build properties
#
# from device/mtk/new/system.prop
#
#
# system.prop for new
#

#
# ADDITIONAL_BUILD_PROPERTIES
#
ro.rommanager.developerid=cyanogenmod
ro.com.google.clientidbase=android-google
keyguard.no_require_sim=true
ro.url.legal=http://www.google.com/intl/%s/mobile/android/basic/phone-legal.html
ro.url.legal.android_privacy=http://www.google.com/intl/%s/mobile/android/basic/privacy.html
ro.com.android.wifi-watchlist=GoogleGuest
ro.setupwizard.enterprise_mode=1
ro.com.android.dateformat=MM-dd-yyyy
ro.com.android.dataroaming=false
ro.build.selinux=1
persist.sys.dalvik.multithread=false
persist.sys.dun.override=0
persist.sys.root_access=1
ro.cm.version=11-20141209-UNOFFICIAL-new
ro.cm.releasetype=UNOFFICIAL
ro.modversion=11-20141209-UNOFFICIAL-new
ro.cmlegal.url=http://www.cyanogenmod.org/docs/privacy
persist.sys.recovery_update=false
ro.cm.display.version=11-20141209-UNOFFICIAL-new
ro.config.notification_sound=Argon.ogg
ro.config.alarm_alert=Hassium.ogg
ro.config.ringtone=Orion.ogg
ro.carrier=unknown
ro.ril.hsxpa=1
ro.ril.gprsclass=10
ro.adb.qemud=1
persist.sys.dalvik.vm.lib=libdvm.so
ro.kernel.android.checkjni=1
net.bt.name=Android
dalvik.vm.stack-trace-file=/data/anr/traces.txt

That's it you are good to go now. Hope you were able to port the recovery successfully.
Note : Please do not report minor bugs like USB storage not mount in PC from recovery. You can easily push files to sdcard if you mount it in recovery (not USB storage) and then push it via adb.
Some useful adb commands which are important and will help you to send files to sdcard while in recovery mode :http://nayeemkhanxda.blogspot.com/2016/05/guide-how-to-adb-terminal-and.html


{বিঃদ্রঃ সকল কাজ নিজের দায়িত্তে করবেন }
(বিঃদ্রঃ আমার কোন লিখা বা অন্য কিছুই কপি করার চেষ্টা করবেননা আশা করি)
এই টিউন সংক্রান্ত কোন বিষয় থাকলে নিচে টিউমেন্ট করুন
ইচ্ছে হলে আমাকে ফেসবুক এ পেতে যোগাযোগ করুন এইখানে

এবং এন্ড্রয়েড আলোচনা পেজ, এইখানে ক্লিক করুন