Walton Live Chat Support: Click Here

Tuesday, January 30, 2018

How to remove Any locked ( pattern / pin / password ) via TWRP Recovery


How to remove Any locked ( pattern / pin / password ) via TWRP Recovery


2016-02-01 17.24.56


If Your Device Won’t Unlock At All

Here’s where things get really dicey. In some rarer cases, your most recent PIN will work at boot, but no PIN will work to unlock the screen–meaning you can’t access anything on your phone. Thankfully, this is fixable too–it just takes a few more steps.
First, boot back into TWRP’s recovery environment. It’ll likely ask you for a password–enter your most recent working PIN (the one you were using before you restored from backup). If you didn’t have a PIN, type in default_password. You’ll be greeted with the main TWRP window.
TWRP-home
Then, head to Advanced > File Manager, and go to the /data/system folder. Scroll down and find the two files with  the .key extension. Delete both of them (by tapping on the file and then tapping the “Delete” button). Then, delete all the files containing the word locksettings.
So on my Nexus 5X, for example, I deleted the following files:
  • password.key
  • pattern.key
  • locksettings.db
  • locksettings.db-shm
  • locksettings.db-wal
TWRP-pinreset
Once you’ve deleted all the key and locksettings files, reboot your system. If it asks you to install SuperSU, choose “Do Not Install”.
You may be prompted for a PIN before your phone finishes booting. Once again, it should work with your most recent PIN–the one you were using before you restored from backup.
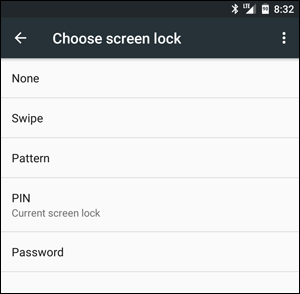
Once Android starts, your lock screen should appear, with no PIN or password prompt. Unlock your phone (yay!) and head to Android’s Settings. Scroll down and go to Security > Screen Lock. From there, you can choose a new PIN or password to lock your phone.
pinlock
After doing so, that is the PIN or password you will use for everything from here on out.

Saturday, January 27, 2018

Airtel Fast Data Pack Buy APP + Tutorial


This Tutorial For Bangladeshi Airtel Sim User,


Download App :
Now See how To Buy :

Turn ON Airtel Internet


Open APP And (Select Try Auto Login)
যে সিম এর জন্য এম্বি কিনবে ঐ সিমের নেট অন থাকলে
try auto login কাজ করবে...
আর যদি অন্য সিমে নেট অন রেখে এম্বি নিতে চাই
তাহলে no and pass option টা use করতে হবে


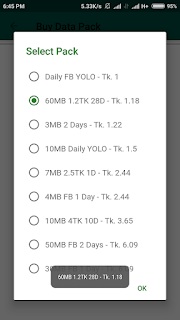
Select Which Pack You Can Buy


Swipe Number How many times you buy data


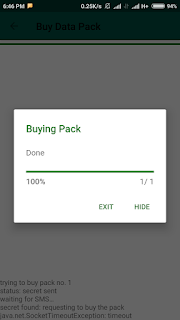
Confirm Buy ! then ok


Wait For SMS ! this app will be auto detect


Ohh ! great Success !


Now See SMS After Buy Completed..


Thanks To

QuadTriangle Team


Sunday, November 26, 2017

Walton Primo NF2 এর জন্য TWRP,Root,স্টক রম নিয়া সম্পূর্ণ আলোচনা [পর্ব-০১]


বিসমিল্লাহি রহমানির রহিম
আজকে TWRP,Root,স্টক রম নিয়া আলোচনা করবো শুধুমাত্র Walton Primo NF2 মোবাইল নিয়া
:twisted: [ বিঃদ্রঃ আমার কোন লিখা কপি করার চেষ্টা করবেননা আশা করি ] :twisted:
ডাউনলোডের আগে নতুন পুরনো সকলের জন্য রুট প্রক্রিয়াটা আরও একবার বর্ণনা করছি
Tools Link:
প্রথমে আপনাকে টুলস গুলো ডাউনলোড করতে হবে
TWRP Installation:
ভিডিও টি দেখলেই হবে :)
কিভাবে রম ব্যাকআপ রাখবেন ? নিচে নিয়ম দেয়া আছে  :)
এবার সেটটা বন্ধ করুন।
১) সেট বন্ধ অবস্থাই Volume UP + Power Button একসাথে প্রেস করে Recovery Mod এ যান।
২) Recovery Mod এ গেলে দেখবেন Backup আছে তাতে ঢুকেন।
৩) Backup এর ভিতর দেখবেন Backup অপশন আছে সব কিছু Select করে ব্যাকআপ করবেন।
৪) ক্লিক করেন আর ওয়েট করুন। একটু টাইম লাগবে ব্যাকআপ হতে।
৫) ফুল ব্যাকআপ হয়ে গেলে সেট রিবুট দেন অ্যান্ড মেমরি কার্ড এ দেখেন TWRP নামে ফোল্ডার হইছে। ৬) এর ভিতর Backup ফোল্ডার আছে এবং তার ভেতর Date & Time দেয়া একটা ফোল্ডার।
৭) এইটাই আপনার Stock Rom ব্যাকআপ।
এইটা সংগ্রহ করুন।
কিভাবে রুট করবেন !
এই লিঙ্ক থেকে Super Su টি ডাউনলোড করুন
ডাউনলোড শেষ হলে সেট বন্ধ অবস্থাই Volume UP + Power Button একসাথে প্রেস করে Recovery Mod এ যান
তারপর জিপ ফাইলটি TWRP দিয়ে ইন্সটল করুন, ইন্সটল শেষ হলে অটো রিস্টার্ট নেবে। তারপর মোবাইল ওপেন হলে দেখবেন নতুন Super Su অ্যাপ এসেছে, অ্যাপ এ প্রবেশ করে অ্যাপটি ইন্টারনেট দিয়ে আপডেট করবেন তাহলেই কাজ শেষ। আপনার সেট রুটেড।
{বিঃদ্রঃ সকল কাজ নিজের দায়িত্তে করবেন }
এই টিউন সংক্রান্ত কোন বিষয় থাকলে নিচে টিউমেন্ট করুন
এই রমটি সর্বপ্রথম এই টেকটিউনস  ওয়েবসাইট এই টিউন করা হয়েছে। ​​​​​​​
ইচ্ছে হলে আমাকে ফেসবুক এ পেতে যোগাযোগ করুন এইখানে
এবং এন্ড্রয়েড আলোচনা পেজ, এইখানে ক্লিক করুন
(ধন্যবাদ সবাইকে,ভাল থাকবেন এবং নতুন নতুন রম  সহ আরও অন্যান্য টিউন করব ইনশা-আল্লাহ, তাই টেকটিউনস এর সাথেই থাকুন  )
চলে যাচ্ছি, দেখা হবে আগামি টিউন এ
7VLXuuR.gif

Walton Primo NF2 + এর জন্য TWRP,Root,স্টক রম নিয়া সম্পূর্ণ আলোচনা


বিসমিল্লাহি রহমানির রহিম
আজকে TWRP,Root,স্টক রম নিয়া আলোচনা করবো শুধুমাত্র  Walton Primo NF2+ মোবাইল নিয়া
:twisted: [ বিঃদ্রঃ আমার কোন লিখা কপি করার চেষ্টা করবেননা আশা করি ] :twisted:
ডাউনলোডের আগে নতুন পুরনো সকলের জন্য রুট প্রক্রিয়াটা আরও একবার বর্ণনা করছি
Tools Link:
প্রথমে আপনাকে টুলস গুলো ডাউনলোড করতে হবে
TWRP 3.0.2 Recovery
Sp Flash Tool
MT6580_Android_scatter.txt
USB Driver
TWRP Installation:
ভিডিও টি দেখলেই হবে :)
ইউটিউব এ Walton Primo N2 এর ভিডিও টি দেখুন একই সিস্টেম Primo NF2+ এর তাই দেখতে ক্লিক করুন
কিভাবে রম ব্যাকআপ রাখবেন ? নিচে নিয়ম দেয়া আছে  :)
এবার সেটটা বন্ধ করুন।
১) সেট বন্ধ অবস্থাই Volume UP + Power Button একসাথে প্রেস করে Recovery Mod এ যান।
২) Recovery Mod এ গেলে দেখবেন Backup আছে তাতে ঢুকেন।
৩) Backup এর ভিতর দেখবেন Backup অপশন আছে সব কিছু Select করে ব্যাকআপ করবেন।
৪) ক্লিক করেন আর ওয়েট করুন। একটু টাইম লাগবে ব্যাকআপ হতে।
৫) ফুল ব্যাকআপ হয়ে গেলে সেট রিবুট দেন অ্যান্ড মেমরি কার্ড এ দেখেন TWRP নামে ফোল্ডার হইছে। ৬) এর ভিতর Backup ফোল্ডার আছে এবং তার ভেতর Date & Time দেয়া একটা ফোল্ডার।
৭) এইটাই আপনার Stock Rom ব্যাকআপ।
এইটা সংগ্রহ করুন।
কিভাবে রুট করবেন !
এই লিঙ্ক থেকে Super Su টি ডাউনলোড করুন
ডাউনলোড শেষ হলে সেট বন্ধ অবস্থাই Volume UP + Power Button একসাথে প্রেস করে Recovery Mod এ যান
তারপর জিপ ফাইলটি TWRP দিয়ে ইন্সটল করুন, ইন্সটল শেষ হলে অটো রিস্টার্ট নেবে। তারপর মোবাইল ওপেন হলে দেখবেন নতুন Super Su অ্যাপ এসেছে, অ্যাপ এ প্রবেশ করে অ্যাপটি ইন্টারনেট দিয়ে আপডেট করবেন তাহলেই কাজ শেষ। আপনার সেট রুটেড।
{বিঃদ্রঃ সকল কাজ নিজের দায়িত্তে করবেন }
এই টিউন সংক্রান্ত কোন বিষয় থাকলে নিচে টিউমেন্ট করুন
এই রমটি সর্বপ্রথম এই টেকটিউনস  ওয়েবসাইট এই টিউন করা হয়েছে। ​​​​​​​
ইচ্ছে হলে আমাকে ফেসবুক এ পেতে যোগাযোগ করুন এইখানে
এবং এন্ড্রয়েড আলোচনা পেজ, এইখানে ক্লিক করুন
(ধন্যবাদ সবাইকে,ভাল থাকবেন এবং নতুন নতুন রম  সহ আরও অন্যান্য টিউন করব ইনশা-আল্লাহ, তাই টেকটিউনস এর সাথেই থাকুন  )
চলে যাচ্ছি, দেখা হবে আগামি টিউন এ
7VLXuuR.gif

Monday, October 16, 2017

How to use XiaomiTool TO Flash MIUI ROMs and Root


How to use XiaomiTool TO Flash MIUI ROMs and Root


1. Connect your phone to the PC with USB and Run the Xiaomi Tool application on your Desktop.
2. Now it will search for the Drivers and the connected devices.
3. Once the phone is connected, you will see the device name and serial of your phone on the screen. From there tap on your device and Hit the Select button.


4. Now your phone will boot in fastboot mode to check the status of your phone.
And you will see the all the status on your app screen, and after that, your phone will boot in normal mode.


5. Now on the next screen, you will see the list of available ROM for your phone. Select the ROM which you want to flash the ROM on your phone. Or Select the 6 option to know more feature of the application.


6. Now you can see lots of other features of the App like Root Phone, Install TWRP, Other fastboot file and lots more.


7. Here in this guide, we are going to flash the Latest fastboot ROM file on our Redmi Note 4, which we already saved on your desktop. So we are going to select “Other fastboot file .tgz” option

If you don’t have the download file. You can choose the other ROM option which you want to flash. The app will first download the file from the MI servers and flash the same on your phone.

8. Now it will ask you to confirm the selection of ROM. Confirm it to start the flashing process.


9. Now the installation process will start and this will take time. You will see all the process in the Application screen.

Between this process, your phone will boot in the fastboot mode so don’t disconnect your phone from the PC.


10. Once the flashing process is completed, you will see a success message on the Application screen. And now your phone will reboot and the first boot will take some time, near about 5 to 10 minutes.


Video Guide to Flash Fastboot ROM on MIUI


Now you have successfully flashed the MIUI ROM on your phone. This is the best and quickest way to fix all MIUI ROM flashing errors. One of the best tool to install MIUI fastboot or recovery ROM on Xaiomi phone.


XiaoMiTool - Automated Flashing Tool


7
XiaoMiTool - Automated Flashing Tool [RELEASED]


“XiaoMiTool, Xiaomi rom changing made easy” That’s the tag line of the new MIUI Flash tool called XiaoMiTool. And it helps you to flash MIUI ROM on any Xiaomi Phone without any problems, Root any Xiaomi MI phone and even install the TWRP recovery on MI or Redmi phones. In simple word, we can say that an All in One tool for the Xaiomi phones. If you are trying to Flash MIUI ROM on your Xiaomi phone with the help of MI Flash tool and getting some errors, then you must have to use this tool.

This small tool will automatically detect your Xiaomi phone device info, ROM which is available to install, which installation method to use and everything that is normally user’s job. We tested this tool on our Redmi Note 4 and rooted our phone with TWRP recovery and flash the latest MIUI GLobal ROM without any error. And all that without using the MI Flash tool. Yes with this free tool you can flash MIUI ROM on the phone without Using the MI Flash tool.


No need to search for the ROM on the internet, it automatically searches the ROM for your and all you have to select the ROM which you want to install on your phone, and it will do all the thing step by step on your phone. Here in this guide, we will show you how to use this Application on your windows desktop and Flash MIUI ROM on Xiaomi phone without using the MI Flash tool.


FAQs:


- Does it work for my device?
This tool is designed to work with the majority of Xiaomi devices, just try it. It only works for Xiaomi devices!


- Can I install this rom if I have this and this...?
Just try, the tool will tell you which rom can be installed.


- Do I need to download anything apart this tool?
No. Just the tool, if you want to install no miui roms (such as lineageos) you need to download them as well.


- Which languages are available? 
English, Italian, Portuguese. More coming


- Does this tool unlock the bootloader?
This tool includes official Xiaomi unlock tool, so you still need to have an authorized xiaomi account and bind it to your smartphone.


- This software is recognized as virus from my antivirus!
No worries, it's a false positive. If it gets reported or blocked, you might want to disable your antivirus before using it.


- This program can be installed but not uninstalled, why?
Uninstaller is not ready yet, if you want to uninstall just delete C:\xiaomi\XiaoMiTool folder.


- English translation is pretty bad...
I know, my English is pretty bad.


- This tool doesn't work...
Sorry to hear that, just go back to old manual modding and leave a comment with error codes please. 


- Do I need to backup my data?
YES! All apps and data will be lost. In some cases internal storage (photos and files) may be kept, but backup those as well


- Can my device get bricked? 
yes, but with very small probability (if very delicate process like edl/fastboot flash gets interrupted). No reports of bricked device yet.


- Can I share this tool?
Yes, you do a favor to me, you can just copy paste this message or do whatever you want. Just let my donation link 


- I need to install lineageos with google services and supersu, how can I do that?
Just select zip file installation and select the files, then make sure they are ordered as needed (rom, gapps, supersu)


Features of XiaoMiTool


XiaoMiTool automates the sometimes difficult procedure which is needed to change rom and you can use it to:


  • Install official roms (Global stable/developer or China stable/developer)
  • Install Unofficial Xiaomi.eu roms (stable/developer)
  • Install any other twrp flashable rom (such as lineageos, resurrection remix, …)
  • Install custom recovery (TWRP or else)
  • Unlock bootloader*
  • Lock bootloader


XiaoMiTool can use different ways to install rom on your device and the right way is automatically detected:


  • Fastboot flash
  • Emergency mode flash (EDL)
  • Stock recovery flash
  • TWRP recovery flash
  • Fastboot unlock (via MiFlashUnlock)/lock


XiaoMiTool retrieve your device info to automatically fetch:


  • Fastboot official rom
  • Recovery official rom
  • Xiaomi.eu roms
  • Official/non-official TWRP
  • Latest SuperSU


Prerequisite to use Xiaomi Tool


1. Make sure your Xiaomi phone bootloader is unlocked.  Unlock Your Mi Device


2. Do take the full backup of your phone. You will lose all you data so save it on your PC.


4. Enable the USB debugging mode. Go to your phone settings > About Phone > Locate Miui Version and tap seven times on it.


After that, you will get a message “You have enabled developer option” on your device screen.
Go back to main Settings.
Open Additional Settings, and tap Developer options to enable it from there.
Scroll down to find USB Debugging option and allow it.


Download XiaoMiTool to Flash MIUI ROM easily


To get started all you have to download the Xiaomi Tool on your Windows PC and Extract the zip file on your desktop. And run the Setup file to install the Application on your desktop.